The Duravant family of operating companies serve the food processing, packaging and material handling segments.


The Four Seasons of Food Processing
June 2022

The season that has the greatest impact to the bottom line is the installation and maintenance season. As you prepare the plant for processing, a thousand tasks need your attention. You may be replacing old equipment or installing a completely new line. Inspection of existing equipment is time consuming, but requires diligence to prevent future unplanned downtime.
Vibratory conveyors are a critical piece of equipment, they connect all of the other pieces of equipment in the plant. You should have a plan to inspect and tune them.
Inspection (refer to your technical manual for specific maintenance procedures)
1. Check the arm springs and arm brackets.
The arm springs will show damage in stages:
- Stage 1 damage appears around the holes.
- Stage 2 damage is evident by parallel lines running through the length of the fiber near the backing plate.
- Stage 3 appears as delamination of the layers, indicated by areas of lighter color.
- Stage 4 is cracking or fractures in the fiber near the backing plate.
You should replace the arms at the earliest signs of damage or on a regular basis.
There are two types of arm brackets: bolt-on and weld-on.
- Bolt-on arm brackets should be checked for proper torque.
- Welded brackets need to be inspected for cracks in the welds.
Be sure to inspect both the bed and frame brackets.
2. Inspect the conveyor frame and bed for cracks. Check weldment areas, specifically corners and braces.

3. For beds with removable screens, ensure the screens are fully seated, the clamps are adjusted and the screens are secure.
4. Inspect the drive mounting plate for loose bolts on the motor and where it is welded to the frame.
5. Inspect the isolator springs or cushions for wear and ensure the bracket is parallel to the support frame.
Tuning
Your vibratory conveyor (aka shaker) was designed to operate at a specified stroke and speed (RPM) for the product you process. Over-stroking will cause the arms to wear out faster and could potentially damage the bed or frame. Inspect the spring arms regularly for wear and breakage. Refer to your shaker drawings for the design stroke and speed for your shaker.
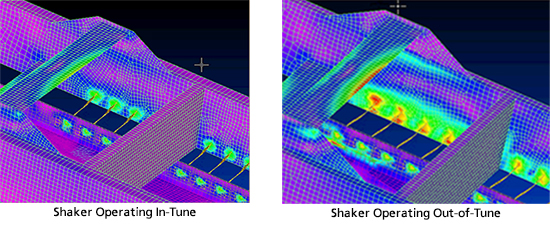
As a reminder, here is the Quick Tune Procedure for Iso-Flo Shakers:
1. Inspect bed for product build-up
2. Make sure that all accessories are tight
3. Check the actual RPM and stroke
4. Adjust RPM to match specified RPM, if necessary
5. Adjust arm springs until actual stroke is equal to design stroke
6. Inspect often and on a regular basis (we recommend daily)
7. Maintain a record of the inspection, including speed and stroke
Refer to your technical manual for more detailed instructions.
Note: The design stroke is NOT the same as the “Max Stroke” that is stenciled on the shaker frame. The Max Stroke is the upper limit that a shaker should not exceed. Think of it like the redline on the tachometer for your car’s engine. You should never allow your shaker to operate at this limit for extended periods of time. Continued operation at or above this limit will eventually cause damage.
Inspection (refer to your technical manual for specific maintenance procedures)
1. Start by looking for signs of corrosion on the sorter housing. The doors should close and latch with the gaskets securely in place and in good condition.
2. Test the lights and emergency stop button to ensure they are in working condition.
3. Confirm the air pressure, water pressure and water temperature are at prescribed levels. If the sorter uses a chiller, check the refrigerant level and follow the guidelines from its manual.
4. Inspect any clean-in-place (CIP) brushes, squeegees and spray bars for proper positioning and operation.
Once the utilities are confirmed to be in working condition move on to the sorting system components.
5. Inspect the computers, cameras, lasers and GUI touchscreen:
- Does the system boot up properly and have the correct KeyWare® or recipes installed?
- Are all the lamps working and providing light to the inspection zones?
- Do any of the protective windows for the cameras or lighting have scratches?
6. Test the ejector valves to ensure correct pressure and valve operation.
7. Finally, check the infeed system. Inspect the infeed shaker and tune, as needed. The belt should be free of discoloration and fraying, be the correct length and track properly.